It's a sign!
Creating signs has become a popular past time in the last few years. From simply-done lettering to more painting-intense versions with added images, sign making is the perfect spring project. Whether you are creating an special sign for spring or everyday use or even getting a head start on your fall and holiday painting, sign making can be a fun and rewarding experience.
Patterns abound, in books and packets, the following are just a few found here at Viking Woodcrafts in our large selection of books and pattern packets.
Viking Woodcrafts also carries a full line of just about any sign shape you could desire. Shown below are just a few, from the mini signs with easels to the grooved style signs. Sizes for signs can range from mini to huge, it's all up to you. Let Viking be your one stop shop for all your sign making!
All wood blanks, books and packets shown in this article are available through www.vikingwoodcrafts.com
Stencil of the Month!
Ah the elegant dragonfly, he flies about with nary a worry. What a fun stencil, combine this with a cute saying and a wooden sign shape and you have a fun spring project! This month's stencil order number - Sku: 52-0147
Upcoming News
Viking's sister company, Painting World Magazine has exciting news, effective in April they will be carried nationwide in select stores in the US and Canada.
Photo Credits - Top - Various Artists, Unsplash & Pixabay. All others Viking Woodcrafts & Painting World Magazine.]]>Here at Viking we have been busy. We recently unveiled our all new roster of brand ambassadors, exclusive designers, stamp and stencil designers and our Tole-tally brush art box project designers. Please welcome these very talented people and watch for some great things from them in the future!
This month on the blog we want to promote a new from Marlene Fudge, Exclusive Designer for Viking Woodcrafts. Using our rectangular wire basket with bottles she has come up with a perfect welcome to spring along with a reversible design for the winter season. This pattern packet will be available soon on the Viking website.
Extra! Extra! Read all about it! Viking's sister company, Painting World Magazine, has some exciting news. We are expanding...
Keep checking the website! Have a great March!
Photo Credits - Typewriter, Markus Winkler
Floral Background, Andrew Small
]]>Hello! It's 2021 and the new year is 1/12th of the way gone. Viking Woodcrafts has been working hard this month to find new product for you. Keep an eye on the website for some awesome finds.
Gift Cards
Did you know you can get gift cards from Viking Woodcrafts? The perfect gift for your artistic Valentine or your special painting buddy. Makes an awesome gift for Easter too! Just click on the photo below.
All about Books
Viking Woodcrafts has one of the best selection of painting books anywhere. With our wonderous roster of artists there is sure to be a design for everyone. From talents like Lynn Andrews and Priscilla Hauser, there are so many to choose from. There are also some great sales going on. Be sure to take a look... just click on the photo below.
Product of the Month
Our rectangular plaque with scrolled corners. A fun surface at a great price.
Be sure to look for Viking exclusive designer Marlene Fudge's awesome free pattern for this piece below...
Click on the photo to order this surface.
Free Pattern of the Month
The Park Bench
By Marlene Fudge CDA
Introduction:
I like to think of this design as a peaceful walk in the park on a beautiful spring day. Sitting on the bench next to the creek sounds like a perfect way to unwind and relax!
Bio:
It is so hard to believe that I have been decorative painting for over 25 years! I have had the pleasure of having my designs published in numerous magazines and e-zines as well as teaching both locally and at conventions. I am very proud to be a DecoArt Helping Artist, a Dynasty Brand Specialist and a Viking Woodcrafts Exclusive Designer. My painting has given me so many wonderful opportunities and I have met the greatest friends along the way.
Supplies:
4 ½” x 8” Plaque, Rectangle w/scroll corners (Item #207-0553, Vikingwoodcrafts.com)
Paints:
DecoArt Americana Acrylics
Black Green
Blue Haven
Blue Harbor
Charcoal Grey
Driftwood
Hauser Light Green
Hauser Medium Green
Lamp Black
Neutral Grey
Rookwood Red
Snow White
DecoArt Extreme Sheen
Antique Bronze
Mediums:
DecoArt Americana Multi-Purpose Sealer
Minwax Polycrylic Protective Varnish- Clear Satin
Brushes:
Dynasty Black Gold
#6 & 12 Shader- 206S
#5/0 Liner- 206L
#3 Round- 206R
½” Mop
Preparation:
Use the #12 shader to coat the entire surface with Multi-Purpose Sealer. Let dry well and lightly sand off any raised fibers. Transfer the lines for the distant trees and the horizon line only for now.
Instructions:
Use the #12 shader to paint the sky, Blue Haven. Mix together equal parts of Blue Haven + Black Green and paint the distant trees using the same brush. The ground and the water are painted with Black Green.
Clouds:
Sideload the #6 shader with Snow White and float the tops of the clouds in the sky. You want to keep the tops of the clouds with a crisp line and then mop the bottoms of the clouds to soften them into the sky.
Distant Trees:
Use the Medium Mezzaluna brush to tap in Hauser Medium Green for the tree tops on the distant trees. Using the dirty brush, tap in some extra highlights here and there with Hauser Light Green.
Let dry and transfer the design for the trees and water line. (Only transfer the trunks of the trees so you have a guideline.)
Grass:
Using the #12 shader, float Hauser Medium Green along the grass areas. Mop in the direction of the small hills to soften the floats. Use the Mezzaluna brush to lightly tap in some Hauser Light Green grass.
Pine Trees:
To add the pine trees, load the Mezzaluna brush with Black Green. Hold the brush vertically and tap in the trunk first. Turn your brush horizontally and starting at the tree top, start tapping in the branches. Keep them smaller towards the top and make them wider as you go down to the ground.
Repeat in a smaller area with Hauser Medium Green to highlight the branches. Let dry and transfer the design for the fence and the park bench.
Fence:
Use the liner brush to paint the fence with Neutral Grey. Shade the rails next to the posts with Charcoal Grey, using the #6 shader. (Switch to the liner for the distant areas.) Shade the left sides of the posts and along the bottom where they go into the grass with Charcoal Grey. Highlight the posts with Driftwood using the same brushes.
Remaining Trees:
Base coat the trunks of the trees with Charcoal Grey using the round brush. Add the branches with the liner brush. Shade the left side of the trunks with Lamp Black using the #6 shader. Highlight the trunks with Driftwood.Use the Mezzaluna brush to tap in some foliage with Black Green. Change the directions of the brush to make the foliage have a more natural look. Highlight the foliage with Hauser Light Green.
Park Bench:
Base coat the slats in the bench with Rookwood Red using the liner brush. Add the sides and bottom of the bench with Lamp Black using the liner. Highlight the slats and the sides with White using the liner.
Shadows:
Float a wash of Black Green under the bench for a shadow using the #6 shader. Add a shadow coming from the trees and the fence posts with the same color.
Rocks:
Make a puddle of Charcoal Grey and Neutral Grey on your palette. Base coat the rocks with the round brush by randomly using the colors listed. Use the dirty brush when changing colors, it is okay if the colors mix. Shade the rocks with Black where they meet the water. Use the #6 shader to highlight the tops of all of the rocks with Driftwood. Skip the color along the tops to make them look rough.
Water:
Use the #12 shader to wash some Blue Haven horizontally through the water. Mop from side to side to soften. Using the #8 shader, load the brush with a small amount of White and holding the brush up on the chisel edge, add some water lines around the rocks.
Details:
Use the liner brush to add some little grasses here and there around the trees, fence, bench and rocks with Hauser Light Green. Add some little blue flowers with the liner brush and Blue Harbor.
Finishing:
Paint the scrolled area with Antique Bronze using the #12 shader. Let dry well. Remove any remaining transfer lines. Varnish with 2-3 coats of Polycrylic.
]]>
Welcome to another fun issue of the Viking Woodcrafts Blog! As we get ready for a big day tomorrow here in the states we would like to wish everyone a safe and happy Thanksgiving!
Be sure to check out our product of the month and the corresponding project of the month.
Enjoy!
Viking’s Surface of the Month!
Our featured surface this month is our Succulent Holder Frame. Available in two sizes, this exciting new surface gives a lot of space for your handpainted treasures or your mixed-media projects. Use real succulent plants in the grids or use artificial greenery. Think outside the box and use the grid for something new! Tracy Moreau has created a fun chicken design. (Contact Tracy at tracymoreau@me.com for more information.) Be sure to check out the free mixed-media pattern for this piece in this issue of the blog.
Viking’s Project of the Month!
This fun and easy mixed media design for the Succulent Holder Frame boxes has been created by Diane Marie Kellogg of Oil Creek Originals. Combining our surface and collage paper, along with some stenciling and some ‘coloring book’ style painting, you can easily create a lovely gift or home decoration.
Supplies –
Viking Woodcrafts Succulent Holder Frames, 8” and 11”.
https://vikingwoodcrafts.com/collections/new-items/products/succulent-vase-frame
Tim Holtz Collage Paper – Forest (Search online. You can also use different prints or paper napkins. I have even stamped tracing paper and used that for this technique.)
Tim Holtz Stencil #THS032 Flourish (Search online.)
DecoArt Glamour Dust – Crystal & Gold, mix evenly.
Greenery/Florals
Emery Board/Nail File
Palette – Decoart
Americana Acylics – Burlap, Lamp Black
Americana Multi-Surface Satin – Green Beret, Dark Scarlet
DecoArt Americana Décor Matte Metallics – Bronze
Media Fluid Acrylics – Sap Green, Viridian, Primary Magenta, Quinacridone Red, Burnt Umber, Quinacridone Burnt Orange, Dairylide Yellow
DecoArt Media Matte Medium
DecoArt Americana Matte Spray
DecoArt Clear Brush-on Varnish
Brushes – Royal & Langnickel
Aqualon: Glaze/Wash, Series R2700, 8/4" (For base coating larger areas.)
Angular Shader, Series R2160 , 1/2" (For shading and high lighting.)
Round. Series R2250 - 4 or 8 (For base coating smaller areas.)
Liner, Series 4200M – 30/0 0r 20/0 Mini Majestic Brush (For line work.)
Soft Grip: White Blending Mop, series SG1400, 1/2" (If desired, for blending.)
Directions -
Step 1 – Base the fronts with Burlap. Use two coats. Base sides with Multi- Surface Dark Scarlet for the larger box and Multi-Surface Green Beret for the smaller one. Once again, using two or three coats for good coverage. The interior may be finished as desired.
Stencil top and sides using the stencil and the matte metallic Bronze. Paint Grids with Matte Metallic Bronze.
Cut the collage paper to fix boxes, you may have to use two pieces. Don’t worry about matching the pattern. Using the matte medium and a large brush, apply a layer of medium to the front of the box. Apply the collage paper, working quickly, and being sure to push out all wrinkles and create a smooth surface. Let edge overlap the box being careful not to allow any excess medium to go over the edge. Once dry, take an emery board and sand off the very edges, pushing away from the center towards the edge.
Once dry, use the Fluid Acrylics to add a wash of color, thinned with water. The pine needles and holly leaves are Viridian, the smaller needles are Sap Green. The pine cones and any stems are Burnt Umber. The thicker ‘knobby’ type plants are done with the Quinacridone Burnt Orange. The larger berries on these are done with the Dairylide Yellow. The berries on the pine needles near the pinecones are done with the Quinacridone Red and the smaller berries on the others are done with the Primary Magenta.
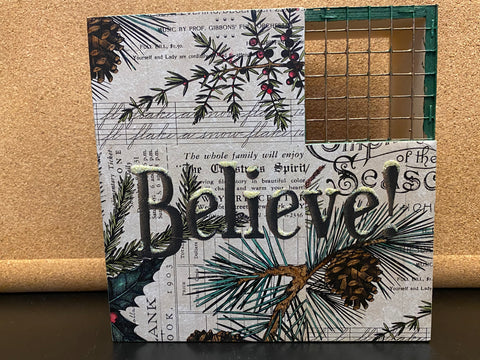
The lettering is done with Lamp Black, the highlight is done with the Matte Metallic Bronze. Use clear varnish to add glitter to lettering, apply varnish as shown in the photo where glitter lies, and working quickly, sprinkle glitter on while wet. Do one section at a time. Once dry, spray the entire frame with matte spray.
For florals in the grid, you can use your choice of florals, succulents, air ferns, etc. Artificial florals work well. I also used some reindeer moss. Another idea…pull pieces of ribbon through the grids to create a ‘bow’.
There is still time to enter our contest...
BLACK FRIDAY & CYBER MONDAY SALES!
]]>Big News for Viking Woodcrafts
As of midnight last night we have a new and amazing website.
We do have some bugs to work out so please bear with us.
OUR EMAIL IS DOWN AND OUR TECH TEAM IS ON IT TO FIX THIS ISSUE AS SOON AS POSSIBLE.
We will be adding and featuring new products. We have some exciting things coming to Viking.….so stay tuned there is more Big news to come!!
If you teach Zoom classes, please contact us about purchasing custom Tole-tally Brushed Art Kits for your students.
Viking has brought a team of strategic individuals together from around the world. They are Brand Ambassadors, Social Media Promoters, Stamp and Stencil Designers as well as Exclusive Designers. We will be making announcements soon and introducing you to them!
Viking will be introducing a new line of children’s and pet decor surfaces.
We have put together an amazing team of very talented artists and designers.
We have a big clearance blowout sale!! Everything is 50% off in the Clearance so go and have a look. We are making more room for new surfaces so go get them before they are gone! Please be sure to check out the new surfaces and check back often for new additions.
Due to recent events that have effected the world over, we have a shortage on paint. Rest assured we will have them back in stock as soon as we can.
-The Viking Woodcrafts Team
]]>
Viking Woodcrafts has been working hard behind the scenes to bring you an all-new website and blog! The new website gives you an easy to navigate format filled with the product you love. From wood surfaces to painting books, from stencils to artist supplies, we have it all.
The new site also has a new blog, with informative articles and fun features. It will help you keep informed of new products and keep you in touch with top artists in the decorative painting world.
The new blog will feature a monthly pattern from a favorite designer, our product/surface of the month and so much more. Look for fun giveaways too!
Product of the Month
Each issue we will promote a ‘product of the month’. For our first entry in this fun category, we give you our fantastic barn doors. Available in a variety of sizes and two very distinct styles, they provide a surface made for the creative mind to decorate.
Project of the Month
Along with the product of the month we will bring you the project of the month. Using Viking Woodcraft surfaces and trending designers in the decorative painting world, we hope to give you some awesome and fun projects. First up is Deb Antonick with her lovely design for one of our barn doors.
Rustic Barn Door – DIY Décor Project
© 2020 Deb Antonick Designs, Painting with Friends
www.paintingwithdeb.com
MY TECHNIQUES:
Float / Shade: I always float my color with the angular Shaders. Mop to soften with a Mop. I shade around my design elements before base coating; I like the softer look I get when I do this. Unless otherwise indicated, I shade around the entire shape and deepen in corners and under design elements for more depth.
Line: Unless otherwise stated, all lining is done with the #10/0 Liner and the paint watered down to an ink-like consistency.
Basecoat: Use the brush that best fits the size of the area to be painted.
Stenciling/Drybrushing: I drybrush my stenciling using a good quality stencil brush. The brush must be dry. When Drybrushing, I load my paint from a dry surface, not a wet palette as the moisture will get into the brush and make the paint go on smudgy. I also keep an old towel handy; it is great for cleaning the brush between colors.
To start, load the brush by tipping it into the paint, blend out on palette paper then wipe and excess paint off on a paper towel. Lightly scrub over the stencil or onto the surface to apply the color. Start softly then press harder depending how much color you need. The harder you press; the more color you will get. Unless otherwise stated, my stenciling is always imperfect for a bit of a distressed look.
PREPARATION:
Note: I apply the varnish as it helps to protect the black when I start to scrub off the white.
PAINTING INSTRUCTIONS:
Frame:
Note: the longer the paint dries, the harder it is to remove and distress.
Panel: see worksheet
Wreath:
Track and Rollers:
FINISHING:
It's Giveaway time! Find this image on our Facebook page and like, comment and share to be entered to win our $100 one time use gift certificate.
]]>